

How to Build a Thriving Garden in 15 Minutes a Day
What if the best thing you could do for your garden was put the shovel down and never pick it up again? The no-dig method is not a shortcut or a workaround. It is a smarter system that builds better soil, produces more food, and asks less of you every single season.
Traditional gardening tells you to till, turn, and break up the ground before every planting season. The no-dig approach does the opposite: leave the soil structure intact, pile organic material on top, and let earthworms and microbes do the work underneath. The result is a garden bed that gets richer and more productive every year, with less input from you each time.
This guide explains exactly how the method works, how to build your first no-dig bed from scratch, and how to maintain it with almost no effort year after year.
What the No-Dig Method Actually Is
The no-dig garden method goes by several names: lasagna gardening, sheet mulching, sheet composting. The core idea is always the same. Instead of digging into the ground to prepare a planting bed, you build the bed upward by layering organic materials directly on top of existing soil, grass, or weeds.
These layers do three things simultaneously. The cardboard base smothers whatever is growing underneath, cutting off light to weed seeds and grass. The organic layers above decompose over time, creating a deep, nutrient-rich growing medium. And the entire system feeds the soil's biological community, which is what actually grows your plants.
The method was popularized in the 1990s by gardener Patricia Lanza, but the underlying principle is older than any gardening book. It mimics exactly what happens in a forest, where fallen leaves and organic matter accumulate on the surface year after year, creating extraordinary topsoil without anyone turning it over.
Why not tilling is actually better
Every time you till or dig soil, you disrupt a complex underground ecosystem. Fungal networks that help plants absorb nutrients get shredded. Beneficial bacteria colonies get scattered. Weed seeds buried deep in the soil get brought to the surface where they can germinate. You do more work and end up with weaker soil than you started with.
No-dig preserves all of that. The soil food web stays intact, earthworm populations build up, and the soil structure improves continuously without mechanical intervention. Most gardeners who switch to no-dig report better plant growth within the first season and dramatically less weeding from the second season onward.
The Real Benefits for a Lazy Gardener
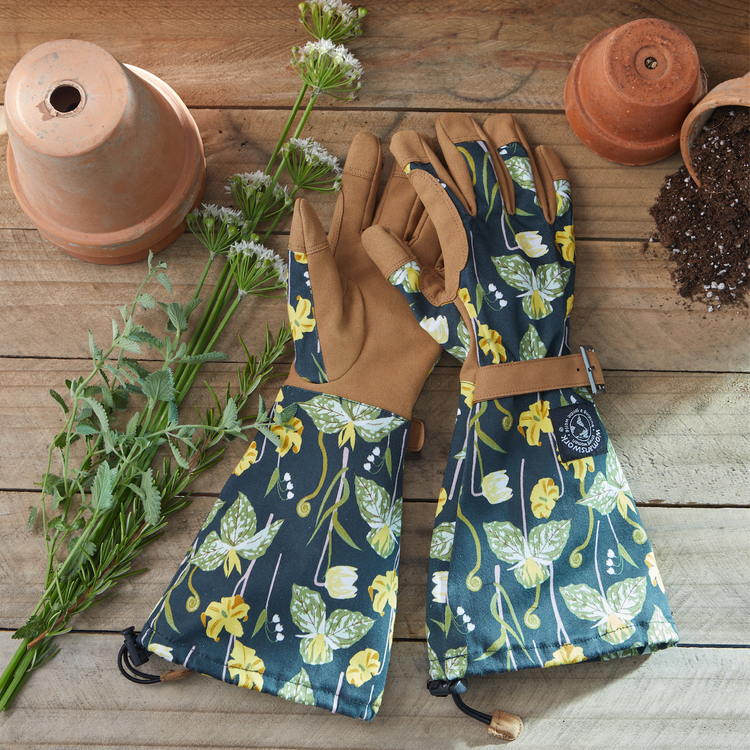
Arm Saver Garden Gloves
Building a no-dig bed means handling cardboard, organic material, compost, and soil with your hands for extended periods. Arm Saver's extra-long cuffs protect your arms and keep debris out, while reinforced synthetic leather palms and a cotton-spandex body keep you comfortable and in control throughout the build.
Shop Arm Saver GlovesHow to Build a No-Dig Bed: Step by Step
You do not need perfect conditions, special tools, or expensive materials. Here is the complete process from start to finish.
-
Step 1Choose Your Spot and Flatten What Is There
Pick a location with at least 6 hours of sun for vegetables, or partial shade for leafy greens. If grass or weeds are tall, mow them short or flatten them by hand. You do not remove them. They will become part of the decomposing layers below.
-
Step 2Lay the Cardboard Base
Cover the entire area with overlapping sheets of plain corrugated cardboard. Remove any tape, staples, or glossy sections. Overlap edges by at least 6 inches so weeds cannot find gaps to push through. Soak the cardboard thoroughly with water until it is completely saturated. This is the weed-suppression engine of the whole system, and earthworms will move into it immediately.
-
Step 3Add Brown Layers (Carbon)
Layer carbon-rich brown materials on top of the cardboard: dried leaves, straw, shredded newspaper, or wood chips. Aim for 4 to 6 inches of brown material. These carbon layers feed fungi, provide structure, and slow down water loss from the bed below.
-
Step 4Add Green Layers (Nitrogen)
Add nitrogen-rich green materials: grass clippings, vegetable kitchen scraps, coffee grounds, or aged compost. Aim for 2 to 3 inches of green material. The green layers provide the fuel for decomposition, feeding bacteria and generating the biological heat that breaks everything down. Alternate green and brown layers for best results.
-
Step 5Top with Finished Compost or Worm Castings
Finish the bed with a 2 to 4 inch layer of finished compost or worm castings. This is the layer your plants will actually grow in. It should look and smell like rich, dark earth. Worm castings are ideal here: they are immediately available to plant roots, improve soil structure, and encourage the biological activity the entire bed depends on.
-
Step 6Water Thoroughly and Plant or Wait
Soak the entire bed deeply after building. If you built in fall, leave it to decompose over winter and plant into it in spring. If you built in spring, you can plant transplants immediately into the top compost layer. Direct seeding works best after 3 to 4 weeks when the top layer has settled slightly.

Worm Castings
The ideal finishing layer for any no-dig bed. Worm castings restore microbial life, improve soil structure, and deliver slow-release nutrition that feeds roots gently all season. Spread a 2 to 4 inch layer on top of your no-dig bed and plant straight into it. No measuring, no risk of burning, and the biology it introduces accelerates decomposition of the layers below.
Shop Worm CastingsWhat Grows Best in a No-Dig Bed
Almost everything grows well in a properly built no-dig bed, but some crops are particularly well-suited to the method. Here is a quick reference:
| Crop Type | Examples | Notes for No-Dig Beds |
|---|---|---|
| Leafy greens | Lettuce, spinach, kale, Swiss chard | Thrive in the rich, moisture-retentive top layer. Plant in fall-built beds as soon as spring arrives. |
| Root vegetables | Radishes, beets, carrots | Radishes and beets do very well. Carrots prefer a deeply decomposed bed (year 2 onward) for straight roots. |
| Fruiting vegetables | Tomatoes, peppers, zucchini, cucumbers | Excellent. Dig a planting pocket through the top layer and add a GroTab tablet for immediate root nutrition. |
| Legumes | Peas, beans | Fix their own nitrogen and thrive in no-dig beds. Ideal for first-year beds that are still establishing. |
| Herbs | Basil, parsley, chives, cilantro | Grow prolifically in the rich, well-drained top layer. Great for edges and interplanting. |
| Flowers | Marigolds, nasturtiums, sunflowers | Marigolds and nasturtiums both direct-sow well into no-dig beds and help with pest management. |
In a first-year no-dig bed where layers are still decomposing, prioritize shallow-rooted crops like lettuce, peas, and herbs. From year two onward, once the lower layers have broken down, you can grow anything including deep-rooted crops with excellent results.
How to Plant Into a No-Dig Bed
Transplants are the easiest way to get started in a no-dig bed. You simply part the top layer of compost, set the plant in, firm the compost around the root ball, and water in. No hole-digging tool required beyond your hands or a small trowel.
For direct seeding, rake the top layer lightly to create a fine tilth, sow your seeds at the correct depth, and water gently. The rich, fine-textured compost top layer is ideal for germination.
For larger transplants like tomatoes and peppers, use a drill auger to punch a clean hole through the top compost layer and into the decomposing layers below. Drop a GroTab fertilizer tablet into the hole, place the transplant, and backfill. The tablet feeds roots for up to 3 months as they establish, and the no-dig bed's biological activity breaks it down naturally.
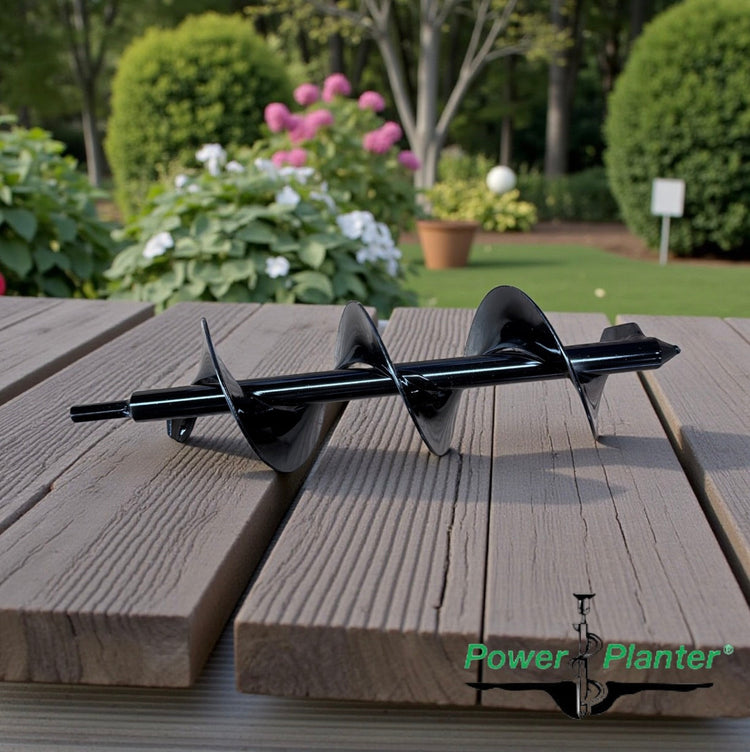
DIY Guru Auger 3" x 12" by Power Planter
The one tool worth having in a no-dig garden. Attach this solid steel 3x12 inch bit to any cordless drill and punch planting holes through compost layers in seconds. It leaves loose soil at the bottom of each hole, reducing transplant shock and making it easy to drop in a GroTab tablet before planting. Works in any layer type from compost to clay.
Shop the DIY Guru AugerMaintaining a No-Dig Bed: What to Do Each Season
One of the biggest advantages of no-dig is how little ongoing maintenance the method requires. Once the bed is built, each season follows a simple and very short routine.
Each spring
Each fall

GroTab Fertilizer Tablets
The perfect companion for no-dig planting. Dig, drop a tablet, plant above it. Each GroTab contains 12-8-4 slow-release NPK, mycorrhizal fungi to supercharge root establishment in new beds, and Trichoderma to boost the biological activity that makes no-dig systems thrive. One tablet per plant, lasts 3 months, no measuring or mixing.
Shop GroTab TabletsNo-Dig Gardening in Small Spaces and Containers
No-dig is not only for large in-ground beds. The same layering principles apply beautifully to raised beds and vertical planters, where the method is actually even more effective because you control the layers completely from the start.
For raised beds, fill the bottom third with rough carbon material like wood chips or shredded leaves, add a middle layer of compost-rich green material, and finish the top third with worm castings and finished compost. Leave it to settle for a few weeks if possible, then plant. The raised bed version of no-dig produces exceptional results because drainage is built in and you start with zero existing weeds.
Vertical planters like the GreenStalk are ideal for lazy no-dig gardening in patios, balconies, and small yards. Each growing pocket already provides the contained, well-drained environment that makes no-dig work, and the patented watering system eliminates the one chore you would otherwise spend the most time on.

3-Tier GreenStalk Original Vertical Planter
Stack 6 growing pockets in a small footprint with a built-in watering system that distributes moisture evenly to every tier. Fill each pocket with worm castings and compost for an instant no-dig vertical bed. No root competition, excellent drainage, and almost no weeding. Ideal for herbs, strawberries, lettuce, and flowers on any patio or balcony.
Shop the GreenStalk Vertical PlanterWhat No-Dig Gardeners Can Stop Doing
Switching to no-dig means leaving behind a long list of conventional gardening tasks that turn out to be unnecessary or actively counterproductive.
Frequently Asked Questions
What is the no-dig garden method?
The no-dig garden method builds fertile soil by layering organic materials directly on top of existing ground without digging or tilling. A cardboard base smothers weeds, and alternating layers of carbon-rich and nitrogen-rich material decompose into rich, living soil. The method mimics how forest floor topsoil builds naturally, and works over grass, weeds, or compacted ground with no soil preparation required.
Can I plant immediately in a no-dig bed?
Yes, if you finish the bed with a 3 to 4 inch layer of worm castings or finished compost. Transplants can go straight in on the day you build. Direct seeding works best after a few weeks once the top layer has settled slightly. For maximum flexibility, build in fall and plant in spring into a fully settled, deeply fertile bed.
What materials do I need for a no-dig garden?
You need plain corrugated cardboard for the base, brown carbon-rich material such as dried leaves, straw, or wood chips, green nitrogen-rich material such as grass clippings, kitchen vegetable scraps, or coffee grounds, and a finishing layer of worm castings or finished compost. Most of these materials are free from your own yard and kitchen.
Does the no-dig method actually work for vegetables?
Yes, very effectively. No-dig beds consistently produce high vegetable yields because the layered organic matter creates rich, well-aerated soil that plant roots love. Preserved soil biology improves nutrient cycling, and many gardeners report better harvests than they achieved with conventionally tilled beds. The method gets more productive every season as the soil matures.
How long does a no-dig bed take to be ready?
A bed built in fall is typically ready to plant by spring, around 4 to 6 months later. A bed built in spring with a thick finished compost top layer can be planted into using transplants on the same day. The lower layers continue decomposing throughout the growing season, feeding plants from below as they grow.
Do I need to redo a no-dig bed every year?
No. Each spring you simply add a fresh 2 inch top-dressing of compost or worm castings and plant straight into it. The bed improves every season as the lower layers continue to decompose and the soil's biological activity builds. No-dig beds typically become more productive with each passing year and require less input over time, not more.
The Garden That Gets Better While You Do Less
The no-dig method is one of the few gardening systems where doing less is genuinely the right approach. You skip the tilling, skip the weeding marathon, skip the annual soil overhaul, and end up with a more fertile, more productive bed than the one next to it that had all that work done to it.
The work is front-loaded: build the layers once, choose the right spot, soak the cardboard properly. After that, the system runs itself. Every season you add a top-dressing of compost, plant into it, and harvest from it. The soil improves. The weeds diminish. The yields increase.
That is the lazy gardener's ideal outcome: a garden that needs less from you every year, not more.
Share